
MICO Platform Overview
Introduction
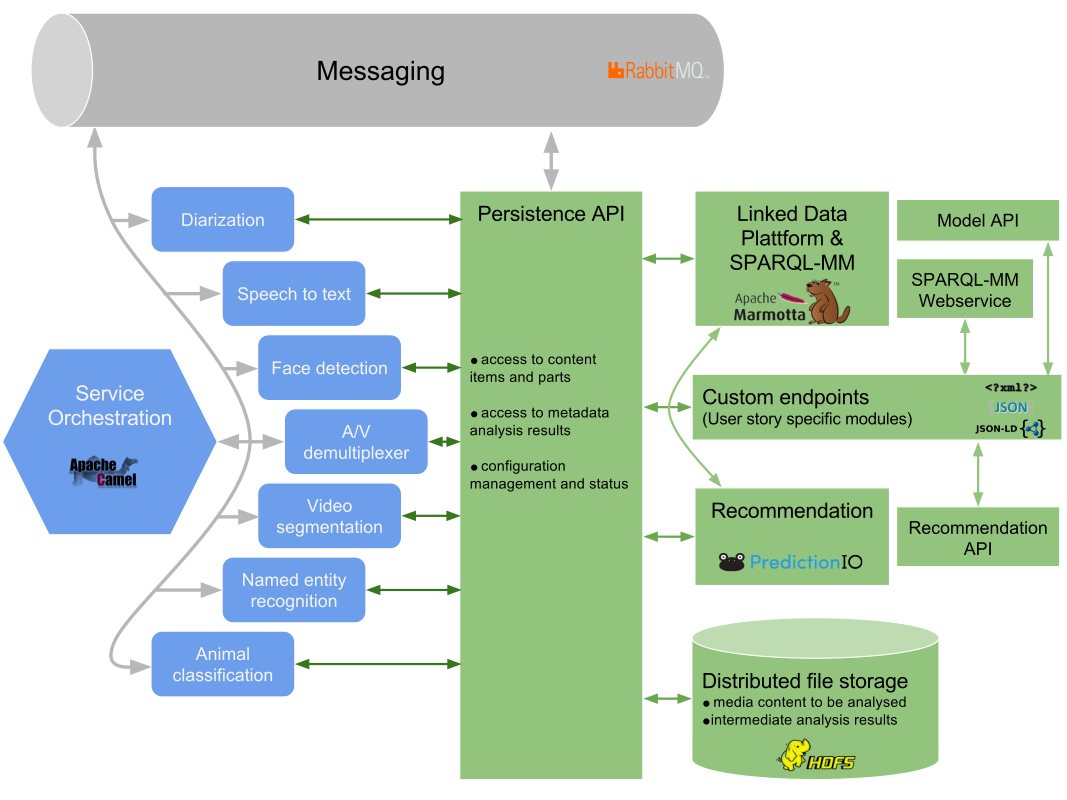
The MICO Platform is an environment that will allow to analyse “media in context” by orchestrating a set of different analysis components that can work in sequence on content, each adding their bit of additional information to the final result. Analysis components can e.g. be a “language detector” (identifying the language of text or an audio track), a “keyframe extractor” (identifying relevant images from a video), a “face detector” (identifying objects that could be faces), a “face recognizer” (assigning faces to concrete persons), an “entity linker” (assigning objects to concrete entities) or a “disambiguation component” (resolving possible alternatives be choosing the more likely given the context). Further details are described in the deliverables D6.1.1 and D6.2.1.
Media Extractors
Extraction Engines Available to MICO
The primary goal of MICO is to build on existing extraction technologies and improve them so they can be used in cooperation instead of developing completely new extraction approaches. To ensure we have a sufficient diversity in cross-media extraction technologies right at the start of the project, several partners bring in technologies they have developed or they have been working with.
The following table summarises the extraction technologies available to MICO. Some functionalities might be covered by different tools with different quality characteristics. For each tool we give the partner who has expertise and the license. Note that there are considerable differences in Open Source licenses: whereas the Apache and BSD licenses are very liberal regarding commercial use, the GPL typically precludes this kind of exploitation.
Orchestrating Extractors
MICO Pipelines are a combination of extractors in a graph like structure to be executed in a specific order to produce cross-media annotations. In order to have a first system ready by the start of the project we implemented a simple orchestration approach in our first MICO broker version. It used a simple mime type-based connections (i.e. string comparison) approach to register extractor processes, determine their dependencies, and to automatically configure pipelines based on these dependencies. However, this meant that all possible connections between all registered extractor processes were established, including unintended connections or even connections producing loops. Therefore, the approach had to be improved in order to support the following features:
- Standardized way of parameter specification passed to the extractor during start-up
- Means of pipeline configuration defining the extractors involved and their parameters
- End-User controlled start-up and shut-down of extractors establishing a pipeline for a specific purposes
We opted for an approach using a mixture of bash scripts and servlet configurations which is shown in the figure below. Every extractor deployed for the MICO system is obliged to support standard start-up and shut-down command line parameters. It also needs to be packaged with a short description bash script specifying the name, description and system (native, Java) it is running for. For easy changes and updates, the pipelines are configured in a separate Debian package. They specify the extractors to be loaded and the parameters to be passed in addition to the run/stop arguments.
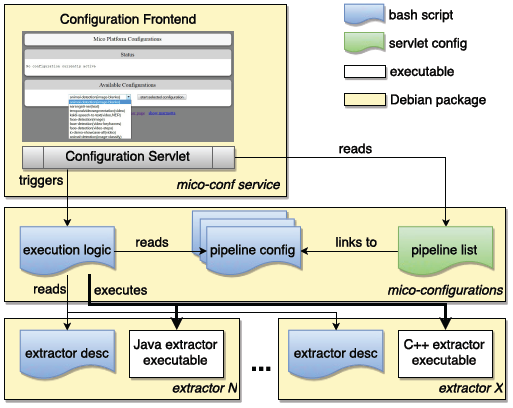
MICO extractor pipeline orchestration
With the release of the final broker version 3 this system is not used anymore for creating MICO processing routes but rather serves as a simple run time configuration system that is now just responsible for starting and shutting down the extractors that might belong to different routes (via the broker web front end). It’s not required to be used though and could be replaced by a different distributed run time management system at any time. In the ideal case of a large scale distribute system, several instance of each extractor in each mode would just be run and execution order selection is completely carried out by the broker.
Details about the broker are given in the broker section .
Metadata Model
For the MICO project with all its produced metadata, we designed an own RDF ontology that is capable to publish and contain all required information in a standardised and harmonised manner. The MICO Metadata Model MMM builds upon the Web Annotation Working Group‘s Web Annotation Data Model WADM, and especially its core concept of the Web Annotation, which is defined “as a piece of further description (e.g. marginalia or highlight) for a digital resource like a comment or tag on a single web page or image, or a blog post about a news article”. The MMM adapts the Web Annotation in order to express intermediary and final results of given extractors. Those results are combined with the ingested multimedia objects in order to create a fully integrated metadata background for the respective object. To do this, the MMM consists of five core modules:

Modules of the MICO Metadata Model
The roles of the Context, Content, and Selection module are adapted from the Web Annotation. The Composition module adds a layer on top of the results represented as Web Annotation, introducing features to create interlinked results to form the combined metadata background. Provenance features are added at various levels of the complete model in order to establish traceability of the results and workflows and add provenance information like timestamps, creators, and so on. Ultimately, abstracting from RDF details and additional nodes to keep it simpler, a complete result object of the MICO platform looks like this:
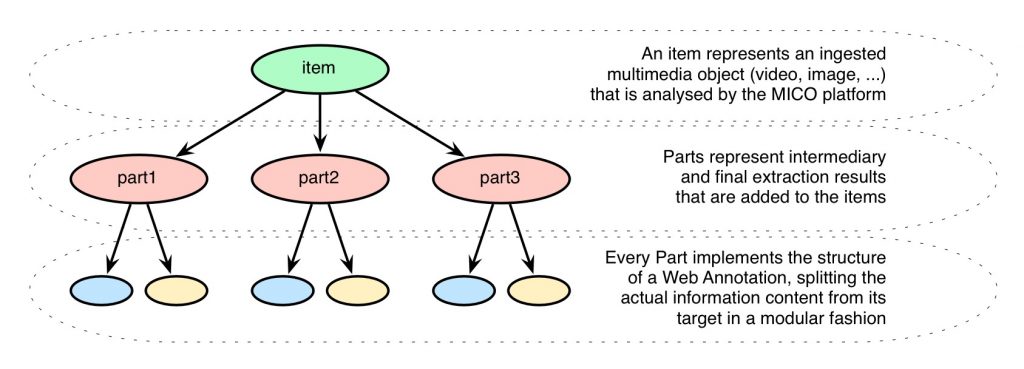
Exemplary structure of a result in the MICO platform
The item at the top represents the ingested multimedia object that has been sent to the MICO platform. Various extractors now add their (possibly multiple) parts to the whole metadata background that is created for the item. Every part itself adapts the structure of a Web Annotation, containing the information content and the target of the annotation (e.g. the whole multimedia object, or only temporal/spatial fragments of it). Different parts and their targets can be interlinked in order to generate the traceable path of work that has been fulfilled successively.
For further information about RDF details please consider the official documentation of the MMM, one of the specification deliverables of the MICO project (volume 2 or volume 4), or the paper “A Platform for Contextual Multimedia Data – Towards a Unified Metadata Model and Querying” (which features a little bit older version of the model, however the ideas and the background remain the same). The MMM has been extended by a sub-ontology MICO Metadata Model Terms MMMTerms, which features MICO specific implementations of some of the extractors implemented during the MICO project. A Java-based application to make use of the MMM has been implemented via the open source library Anno4j. For a guideline of how to use Anno4j, refer the last tech deliverable of the MICO project (volume 5, which is soon to be published here) or the paper “Anno4j – Idiomatic Access to the W3C Web Annotation Data Model” in the ESWC 2016 Satellite Events.
MICO Broker
The MICO broker is responsible for orchestrating heterogeneous media extractor services, and hence is the key for realizing the potential of multi-modal and complex media extraction workflows.
Further information are available in blog series about the broker.
Querying
The MICO project is about extracting information of various kinds from a broad range of media types
like images, video, sound, and text. This information is represented in a unified data model, which is based on W3C recommendation efforts around web annotations. To retrieve parts of such information that satisfy use case specific
needs users require a well defined toolkit for query formalization. We mainly separate here 2 different query mechanism for RDF, that we developed / extended within the Mico:
SPARQL
The W3C SPARQL 1.1 recommendation defines the syntax and semantics of the SPARQL query language for RDF. It fits many use case scenarios and is denoted as the de-facto query language for the Semantic Web. SPARQL queries manly consist of the following blocks:
- PREFIX Prefixes allow to shorten URLs. They are optionally defined on the top of a SPARQL query.
- PROJECTION This block represents the projection part of the language. SPARQL allows 4 different kind of projection:
- SELECT, CONSTRUCT, DESCRIBE, and ASK.
- DATASET This block allows to specify the context(s) in which the query is evaluated.
- SELECTION This block (WHERE) may contain triple patterns, optional clauses, existence checks and filters.
- LIST OPS This block allows result ordering (ORDER BY) and segmentation (OFFSET,LIMIT). AGGREGATION This block allows result aggregation (GROUP BY, HAVING).
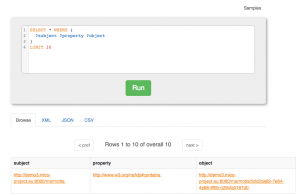
The figure shows a SPARQL query that lists all classes (types) and their number of appearances.
SELECT ?class (COUNT(?class) as ?number)

WHERE {

   [] a ?class .

}

GROUP BY ?class
A wider set of SPARQL examples can be found in the Mico Technical Report Volume 3.
SPARQL-MM
SPARQL-MM is a Multimedia Extension for SPARQL. The extension includes relation, aggregation and accessor functions for media fragments but is under continuous development. A complete function list if the current version (SPARQL-MM 2.0) can be found in the Mico Technical Report Volume 5 and on the code repository of the reference implementation.
The following examples show some simple SPARQL-MM queries. Example one presents a spatial relation.
PREFIX rdfs: <http://www.w3.org/2000/01/rdf-schema#>

PREFIX mm: <http://linkedmultimedia.org/sparql-mm/ns/2.0.0/function#>

SELECT ?t1 ?t2 WHERE {

   ?f1 rdfs:label ?t1.

   ?f2 rdfs:label ?t2.

FILTER mm:rightBeside(?f1,?f2)

} ORDER BY ?t1 ?t2
Example two shows a temporal accessor.
PREFIX ma: <http://www.w3.org/ns/ma-ont#>

PREFIX mm: <http://linkedmultimedia.org/sparql-mm/ns/2.0.0/function#>

SELECT ?f1 WHERE {

   ?f1 a ma:MediaFragment.

} ORDER BY mm:duration(?f1)
Example 3 shows a spatio-temporal aggregation.
PREFIX rdfs: <http://www.w3.org/2000/01/rdf-schema#>

PREFIX mm: <http://linkedmultimedia.org/sparql-mm/ns/2.0.0/function#>

SELECT ?f1 ?f2 (mm:boundingBox(?f1,?f2) AS ?box) WHERE {

   ?f1 rdfs:label "a".

   ?f2 rdfs:label "b".

}
LDPath
In some cases SPARQL is not the best solution for all use cases due to its complexity and steep learning
curve. Especially when projects try to hide such complexity in order to be attractive to a broad community
there is a need of solutions that offer a good tradeoff between feature completeness and simplicity
in usage. LDPath, a path traversal language similar to XPath or SPARQL Property Paths is such a straight-forward candidate. In Mico we use it internally for Anno4J filter mechanism. Additionally it is available via Marmotta webservices. The figure shows a LDPath query that returns the labels of all extracted topics for a single content item.
@prefix mico: <https://www.mico-project.eu/ns/platform/1.0/schema#> ;

@prefix oa: <http://www.w3.org/ns/oa#> ;

@prefix rdf: <http://www.w3.org/1999/02/22-rdf-syntax-ns#> ;

@prefix fam: <http://vocab.fusepool.info/fam#> ;

   annotation = mico:hasContentPart/mico:hasContent/oa:hasBody[rdf:type is fam:TopicAnnotation]/fam:topic-label :: xsd:string ;
More LDPath examples can be found in the Mico Technical Report Volume 5.
Recommendation
MICO’s recommendation is about providing a framework that uses both collaborative filtering and content-based approaches for recommendations within the platform.
The relevant use cases can be separated into two domains:
- Recommendation use cases which require collaborative filtering only, e.g., evaluating user likes
or site accesses. - Cross-media recommendation use cases, for which the problem may be defined as follows: The
task of finding a suitable selection of media items, where there are at least two different types of
input media sharing the same context.
For the collaborative filtering cases, MICO uses prediction.io as a highly customizable recommendation framework. Within the MICO platform,Inside MICO it is coupled within an optional Docker module. Example configurations are available for Site statistics and image likes. Inside the MICO platform, a REST api handles the communication with prediction.io for getting recommendations. See the section on “Getting recommendations” on how to install the WP5 modules.
For the cross-media recommendation, the project focuses on providing infrastructure for implementing a cross media workflow as described by Köllmer et.al in A Workflow for Cross Media Recommendations based on Linked Data Analysis. The main application being the “Editor Support Showcase”. The second cross media recommendation application is filtering of Zooniverse subjects in debated items, to recommend them for expert review.

Integration of recommendations within the MICO platform.
The overall infrastructure is depicted in the figure. Note, that the recommendation gets content metadata out of the Marmotta triple store via Anno4j, i.e. uses metadata provided by MICO extractors. For further information, see the recommendation repository and the description in “Getting recommendations“.
Install MICO Platform
Install Platform
This section guides you through the installation of the MICO platform on a Linux Debian platform. For quick-start use the virtual machine image with the pre-installed MICO platform.
The packages are designed for Debian Jessie (AMD64 architecture). For the next steps we assume you have a running Debian Jessie AMD64 with administratives privileges. All follow steps need to be run with root privileges:
1. Create the file /etc/apt/sources.list.d/mico.list and add the line:
deb http://apt.mico-project.eu/ mico main contrib
2. Update the package information, install the repo key and reload package information by typing the following lines:
apt-get update

apt-get install mico-apt-key

apt-get update
3. Install the platform and extractors (during these steps you will be prompted to change some settings, you should be fine with the default values):
apt-get install mico-platform
The hostname plays a very important role and can not be easily changed later. So you should not use IP addresses or FQDNs that conflict with existing names.
All platform services get started on boot. The extractor pipelines can be started using the configuration Web interface.
Now you can go on installing extractors.
Configuration
The necessary configuration parameters are queried during the installation of the packages. Most of them have proper default values you can go with. Some of these configuration values can be changed afterwards using the packaging command line tool dpkg-reconfigure <package-name>. Changing the configuration needs a restart of the affected modules, that might include the platform and all extractors.
These are the important configuration values regarding the Platform core modules:
- mico-base package configures the MICO username, password and home directory: These configuration parameters are used in several ways and therefore should not be changed without being cautious.
- A system user is created on Debian with the given password and home directory. All extractor processes will run as this user.
- The MICO API uses RabbitMQ for communication. During installation of mico-rabbitmq a RabbitMQ user according to these values is created. These packages use the credentials to connect to RabbitMQ: mico-broker, mico-configuration and mico-persistence.
- Marmotta (mico-marmotta) uses the credentials to create a user for it’s backend database on PostgreSQL.
- mico-marmotta package holds configuration values for the backend database (hostname, database name). As described above the credentials for the databse are the MICO username and password. The hostname plays a special role as it used as the hostname for all core functions and therefore must be resolveable by remote systems that for example run extractors. The hostname is relevant for the common data storage URL, Marmotta URL, RabbitMQ and Broker services. (We agree that the hostname configuration should not be part of this package as it is confusing. This will be fixed in the future.)
- The mico-registration-service is responsible for managing the registerations of extractors for the platform. It’s package configuration values affect the database for storing the extractor management data only.
- The mico-workflow-management-service handles the extraction workflows. The necessary data is stored in a database, where the package configuration handels the database settings.
- The backend storage that is used by the broker, extractors and all other components using the MICO API can be configured in the JAVA Broker context. You can find the context configuration file at /etc/tomcat7/Catalina/localhost/broker.xml.tmpl and adapt the parameter mico.storageBaseUri to your needs. Don’t forget to do a dpkg-reconfigure mico-broker. All components need to be restarted if changed, as this (new) setting is communicated on startup.
More configuration settings can be found in /etc/tomcat7/Catalina/localhost/*.xml.tmpl.
If you have any troubles you might want to check the log files. The logs of the Platform can be found in /var/log/tomcat7/ and for the extractors /var/log/mico-extractor-<extractor-name>/.
System requirements
In a test scenario we suggest to provide a system with these minimum requirements:
- At least 15GB of free disc space
- Minumum of 4GB RAM (some extractors won’t be available)
Some extractors like the animal detection (yolo), the speech-to-text and the OpenNLP NER have a much higher main memory footprint and won’t run on a system that covers the minimum requirements only. Also in production use with lots of parallel requests we recommend a more powerful system. As the requirements are very specific to the use case there is no guidline that gives the optimal resource quantities. Anyway you should start with these:
- At least 100GB of free disc space
- Minumum of 32GB RAM
- 4+ CPU cores
Install Extractors
Make sure you have a running MICO platform before installing any extractor, as the extractor will register iteself during installation and the registration service is part of the core platform.
If you have a graphical user interface you can use your Package Manager of choice or just open a command line shell with root privileges to install the extractor packages.
The following extractors are publicly available (the package name is in brackets). Install them by using your Package Manager of choice or open a command line shell (with root privileges) and type apt-get install <package-name>.
- Audio demux (mico-extractor-audiodemux)
- Speech-to-text (mico-extractor-speech-to-text), you might need Kaldi2RDF and Kaldi2TXT too
- Kaldi2RDF (mico-extractor-kaldi2rdf)
- Kaldi2TXT (mico-extractor-kaldi2txt)
- Mediainfo (mico-extractor-mediainfo), you might need MediaTags2RDF too
- MediaTags2RDF (mico-extractor-media-tag2rdf)
- Animal detection in two variants (mico-extractor-animaldetection-dpm or mico-extractor-animaldetection-yolo, you can install both, the pipeline chooses which one to use), you might need ObjectDetection2RDF too
- Face detection (mico-extractor-ccv-facedetection), you might need ObjectDetection2RDF too
- ObjectDetection2RDF (mico-extractor-object-detection-rdf)
- Diarization (mico-extractor-diarization)
- OpenNLP NER (mico-extractor-opennlp-ner), with language models for english, german, italian and spanish (mico-extractor-opennlp-ner-models-model-en, mico-extractor-opennlp-ner-models-model-de, mico-extractor-opennlp-ner-models-model-it, mico-extractor-opennlp-ner-models-model-es)
- OpenNLP text classifier (mico-extractor-opennlp-text-classifier)
To uninstall an extractor you can use apt-get purge <package-name> <registration-package-name> (a registration package comes along with every extractor, named like the extractor packges with an -registration appended, so make sure you also uninstall this).
(Pre-defined) Workflows and Extractor startup
The MICO Platform is shipped with some pre-defined workflows. Before you can start processing items you need to make sure the necessary extractors are up and running for the workflow of choice. This of course applies to all kind of workflows (your own or pre-defined). For pre-defined workflows you can start the necessary extractors via the Platform Configuration web interface: http://mico-platform:8080/mico-configuration/ (supposed your MICO platform is available with mico-platform).
To make use of the pre-defined workkflows the following extractor configuration needs to be started:
- For face detection on images start configuration face-detection(image).
- To perform animal detection on images start the configuration animal-detection.
Manual start/stop of extractors
To start up extractors for your own workflows you need to login into your MICO platform machine (e.g. using SSH). You need to execute the following command as root:
/usr/share/mico/configurations/mico-start-extractor.sh [extractor_name] [host] [user] [password] [start|stop] <extractor_args>
- extractor_name: The name of the extractor, e.g. mico-extractor-ccv-facedetection
- host: The hostname the MICO Platform is running, e.g. mico-platform (as for the virtual image machine)
- user and password: The username and password to register via RabbitMQ. The default is mico for both.
- start or stop: Start an extractor or stop it.
- extractor_args: Some extractors needs additional arguments on startup.
Virtual Machine Image
The virtual machine image provides a ready-to-use installation of the platform and can be downloaded as Open Virtualization Format (OVF). This format is supported by most current virtualization software. We recommend the use of VirtualBox.
The image is not intended for use in public or untrusted environments! The reason is that there are no safeguards against unauthorized (remote) access.
First steps
The URL of the overview page and the provided services depends on your network configuration. In the first step you should configure the DNS resolver of the computers from wich you access the MICO platform. For Windows open the file %systemroot%\system32\drivers\etc\hosts (where %systemroot% depends on you local configuration, but typically is c:\windows), on *nix systems it is /etc/hosts (make sure you have administrative privileges) and insert a line with the hostname of the machine the MICO platform runs on followed by its external IP adress. If you run the virtual machine image on your local computer this will look like:
mico-platform 127.0.0.1
Then start a browser and go to the overview page http://mico-platform:22080/. Something like the following should show up:

All platform services get started on boot. The extractor pipelines can be started using the configuration Web interface.
The virtual machine image exposes it’s services to the host machine through port forwardings. To avoid problems with privileged ports those are exposed on different ports. If the virtual machine image runs on your computer and you have configured the DNS name (see above) the following link will take you to your local MICO platform instance:
- MICO platform overview page (host port 22080 is forwarded to 80): http://mico-platform:22080/
- Broker: http://mico-platform:8080/broker/
- Marmotta: http://mico-platform:8080/marmotta/
- Extractor startup page: http://mico-platform:8080/mico-configuration/
Additional services that are exposed to the host machine:
- Login to the MICO platform via SSH on port 22022 (is forwarded to 22 on the guest) with Username user and Password user.
- RabbitMQ on port 5672
- RabbitMQ administrative webinterface: http://mico-platform:15672/ (use default user and password: mico)
- HDFS (Hadooop Distributed Filesystem) on ports 8020 and 50010
The default user and password for accessing the MICO platform services is mico.
Have a look at Content injection to a pre-defined workflow for a first try.
Using the MICO Platform
Content injection to a pre-defined workflow
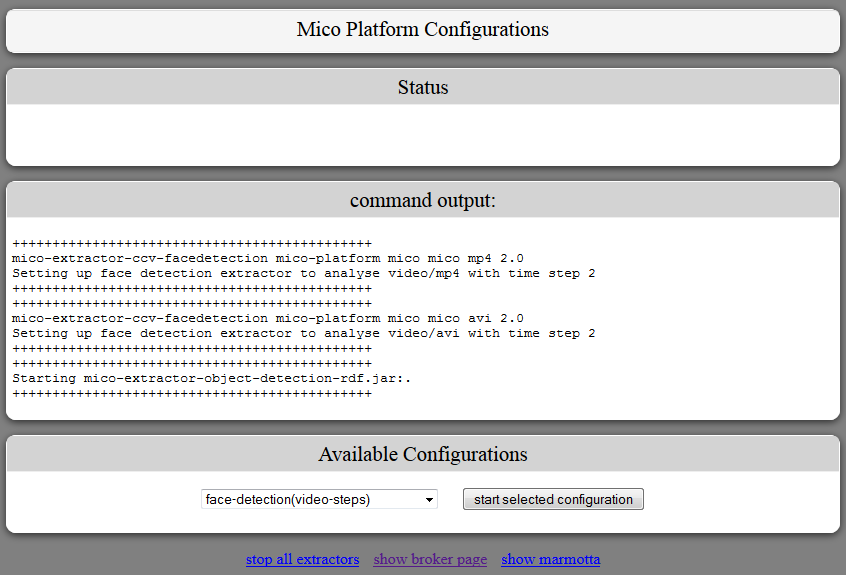
Go to Broker page and click on Platform Configuration to start up requried extractors.
Choose workflow (e.g. face detection for images) and click on start selected configuration.

A command output window shows if the extractors got started. If any errors show up all extractors for the workflow are stopped even if they started properly. See the error message to get further information (e.g. extractor not installed, …).
If you have already started extractors before from this user interface you can see this in the Status window.
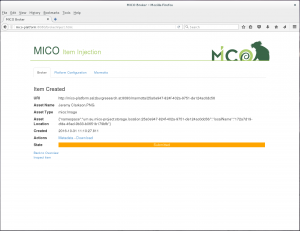
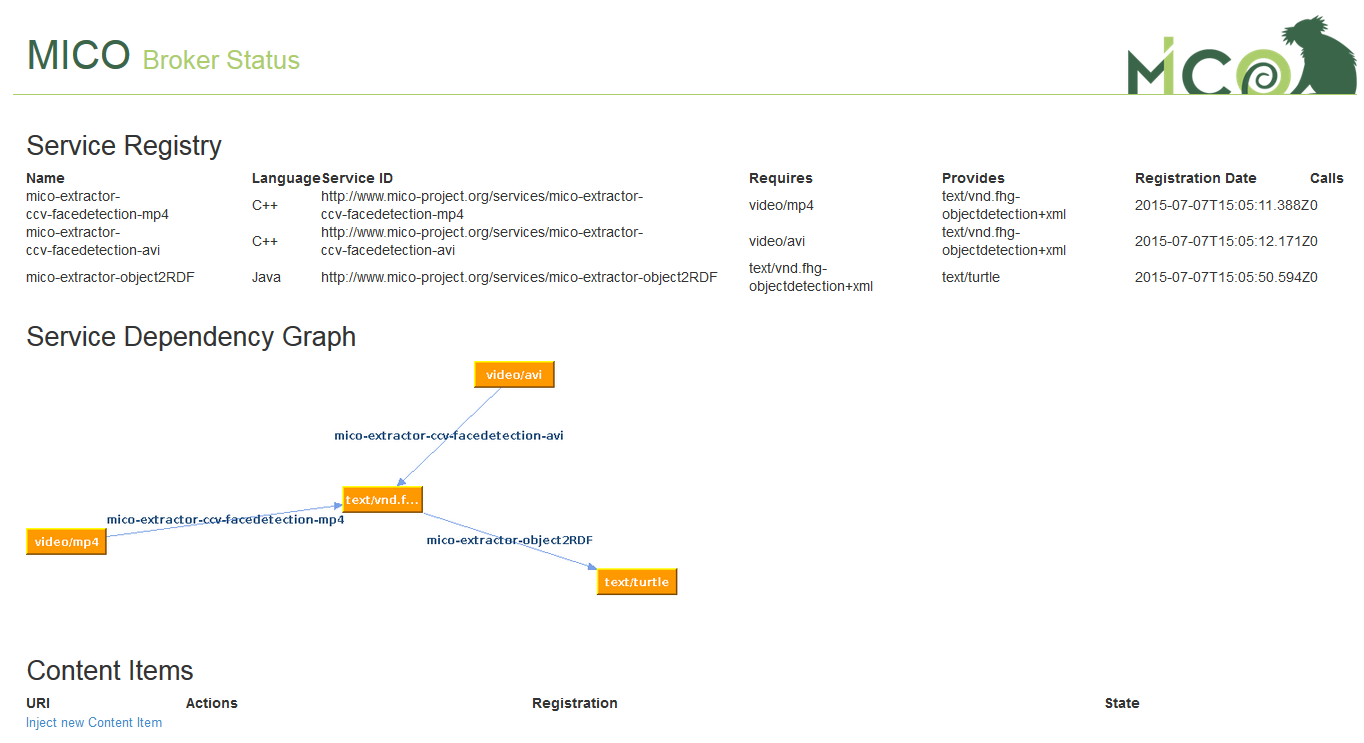
Go back to the Broker page, where you see the list of running extractors and a graph visualising their dependencies. To inject an item click on Inject new Content Item on the bottom of the page.

Choose a file to inject, than the Syntactic Type gets chosen automatically. If not you have to change it manually. Click Create Item to upload it to the Platform.
To start item processing you have two choices:
- Click the submit button in section Submit Item (broker v2): The item will be processed by all running extractors that fit the syntatic type of the item.
- To choose the specific workflow the item should get processed, chosse the proper one under headline Submit Item (broker v3) and click Subtmit. The item will be processed by the extractor chain defined by the workflow.
After that the State changes to Submitted. By reloading the page you can check the State which will go to Finished or Error. You also have an overview of all items and their state on the Broker page.
To see the details and (intermediate) results of the processed item click on Inspect (on the Item Inject page or on the Broker page). There you see the current processing state, the item details and all extractor results.
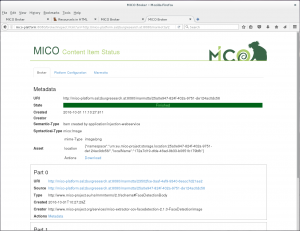
To see the stored results for the item in the Marmotta Triple store click on Metadata.

Progress monitoring
After injecting new content to the platform the processing state (progress, finish, failed) is shown on broker start page. 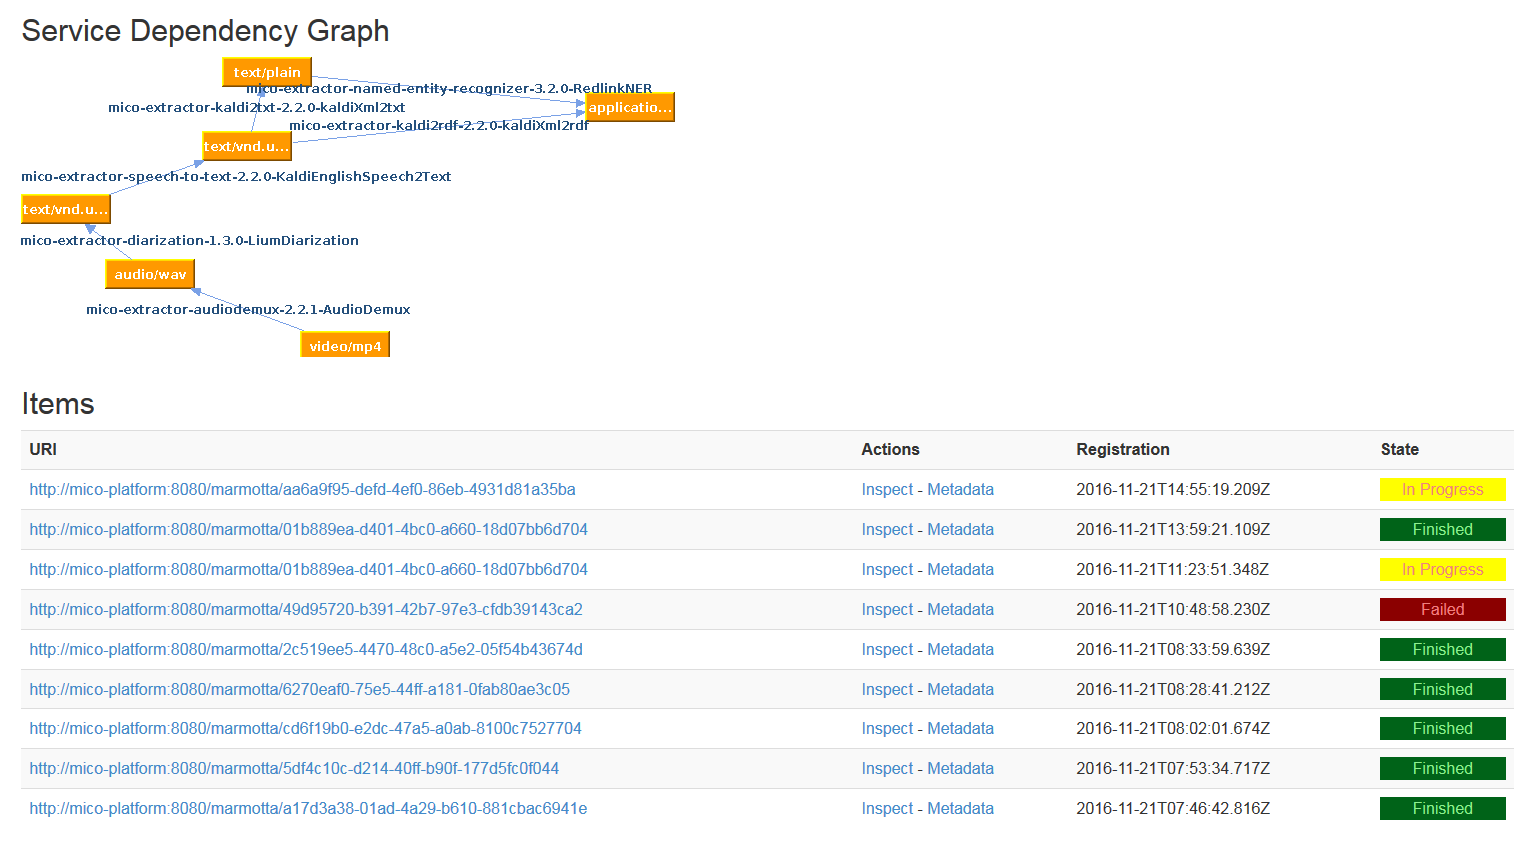
By clicking on Inspect link a list of extracted parts is shown as well as information about processing state of parts, like names of services that are analyzing the parts.
Inspect media item: showing item with 2 created parts and one in transition state, which is currently analyzed by kaldi-speech-to-text service
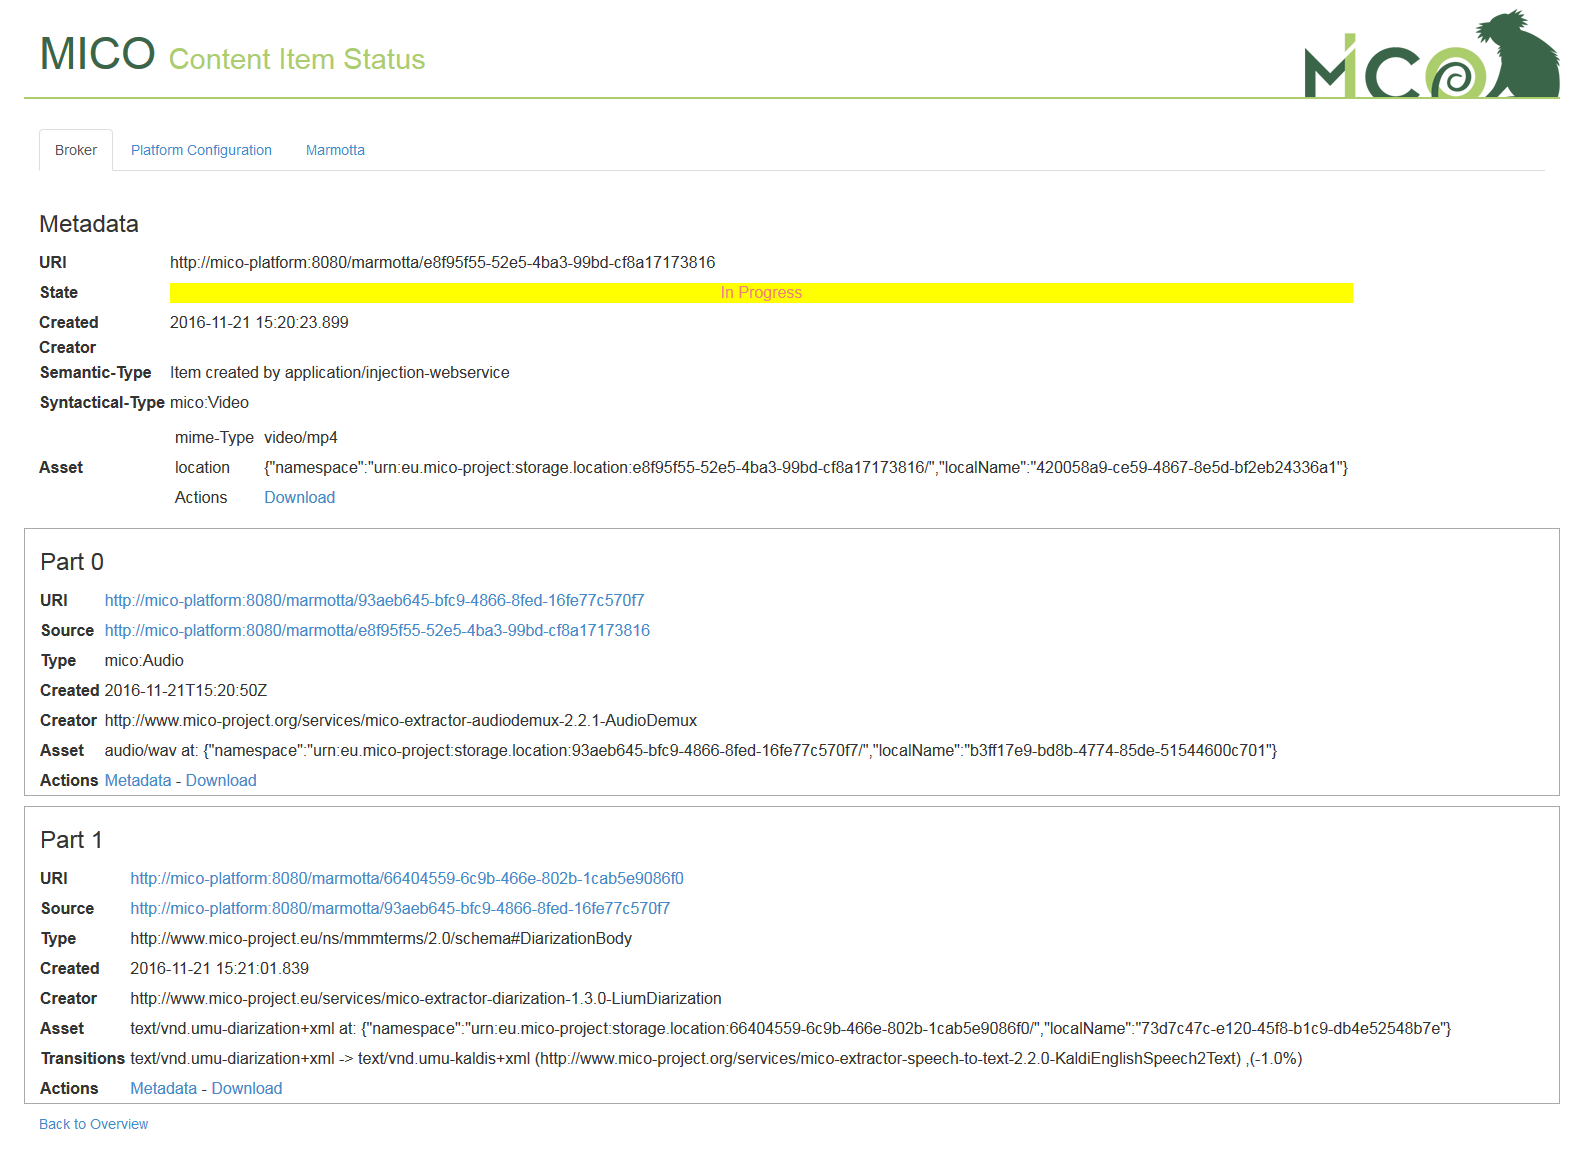
Checking for errors
If an error occurs during analysis process the broker will indicate an unsuccessful analysis request on the overview page, as shown in the picture below. By hovering the red “FAILED” line further information are shown.
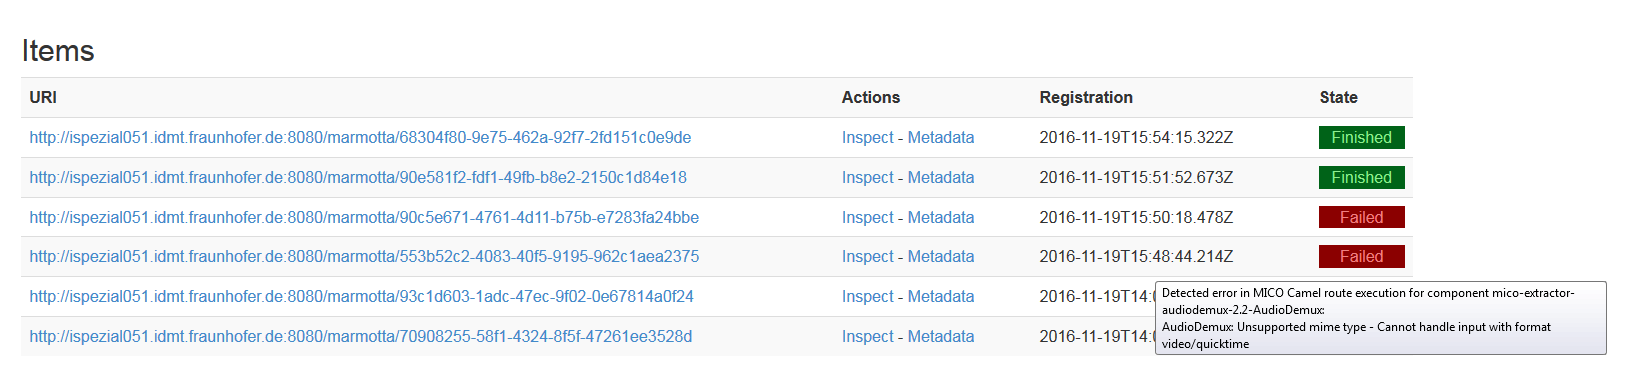
check processing state of injected item
Extractor and platform developers can find further information in the log files. The log output of the platform core modules (Broker, Marmotta, etc.) are stored in the Tomcat log files in the directory /var/log/tomcat7/.
Each extractor runs as own process and therefore has it’s own logging directory. This is located at /var/log/mico-extractor-<extractor-name>.
Querying results
To enable result querying in the Mico Platform we use the standard Marmotta query interfaces (that are partly an outcome of the Mico project). The User Interfaces are purely build on top of webservices, so the interfaces are accessible by both, human and machines. The query languages itself are exhaustively described within the Mico Technical Reports. In this section we give a short overview on the query interfaces.
SPARQL query interface
SPARQL is the de-facto standard query language and protocol for the Semantic Web. Marmotta integrates this standard and allows to issue queries by standardized webservices as well as via using a proper user interface. The Marmotta SPARQL UI is using the standalone Open Source project Squebi, which is a clean SPARQL UI supporting:
- customization of SPARQL result visualization
- support for SPARQL 1.1 (update and select)
- bookmarkable uris that define queries and the visualization type
- support for SPARQL query editing
- Auto-creation of URIs prefixes
- Autocompletion for well known ontologies
Marmotta SPARQL query UI (enabled by Squebi)
SGVizler data visualization
The Marmotta framework integrates the data visualization framework SGVizler that allows to turn SPARQL results into graph visualizations. Thereby it supports a broad set of visual types, like charts, maps, tables, etc.
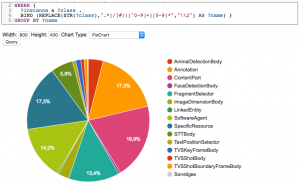
SPARQL data result visualization with SGVizler
LDPath query interface
In addition to SPARQL, the Mico System (or the underlying Marmotta RDF Store) supports a Graph Traversal Language called LDPath. Starting from a resource, the whole data graph can be walked through. The user is rather simple but may be extended in further versions.
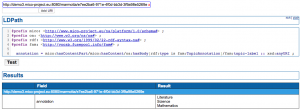
LDPath query interface
Getting Recommendations
The Recommendation API is developed as a tomcat webapp inside the platform repository:
bitbucket.org/mico-project/platform/src/HEAD/showcase-webapp/.
The deployment can be done automatically using maven, providing the respective MICO instance
in the pom.xml. More details regarding the configuration can be found here:
Having built a *.war file, a manual upload to the tomcat manager webapp is possible as well: The showcase-webapp.war must be placed within the directory /var/lib/tomcat7/webapps/. The tomcat server detects and deploys the file automatically (startup usually takes two minutes).
For collaborative filtering applications, prediction.io must be installed on the platform. The suggested way is to install prediction.io within a docker container to decouple its dependencies from the platform and make the installation process reproducible.
After that, the recommendation API is available as described in the API documentation.
Running Prediction.io using a prepared MICO Dockerfile
Docker accepts git repositories instead of local files as references to Dockerfile & Co. This allows us to
store the Dockerfile inside bitbucket for testing.
You have to adjust the path accordingly (e.g., change the username), see the Docker docs for syntax details.
During the build phase, all of the prediction.io requirements (Spark, elasticsearch…) are automatically downloaded and configured inside the docker container.
For public releases, this can be published on public repositories, making this adjustment step only
required for development:
$ docker build --tag="wp5" https://user@bitbucket.org/mico-project/recommendation.git#greenpeace:PredictionIO/docker
$ docker run -p 8000:8000 -p 7070:7070 -p 9000:9000 wp5
The Engine is deployed to port 8000 and can be used by the demo interface or showcase partners. Check
http://localhost:8000 for the prediction.io overview page.
Develop new extractors
Implementation guidelines
The source code for all Open Source extractors is hosted on the MICO extractor repository. The repository also contains detailed implementation guidelines for C++ and Java.
Annotation of Results – Using the MICO Metadata Model and Anno4j
The following section will guide through the process of annotating results. This means to the preparation of your own extractor and the incorporation of an extractor’s result into the RDF structure of the MICO platform. To do this, we will explain in short how the results are represented inside the MICO platform and what the RDF graph looks like, then we will show small examples that explain step by step of how to create results.
The MICO Metadata Model MMM (see also this blogpost) establishes the RDF ontology and therefore the model that is used for all intermediary and final results in the MICO platform. The MMM is an extension to the Web Annotation Data Model WADM, adding a layer of interlinkability and provenance atop the core concept of the WADM – the **Web Annotation**. These are utilised to support information about a given resource in a modular way.
The core technical component to persist and query results is Anno4j (documentation is available on the github page, see also this blogpost, a paper is available here), which provides an Object-RDF-Mapping (ORM) that is utilised in order to turn simple Java POJOs into RDF metadata and vice versa. Anno4j is used for Java extractors, for the C++ pendants an extensions to the library called Anno4cpp has been implemented.
For the interested user and for further clarification, we advise to read the MICO deliverables written in the period of the MICO project. Especially the last deliverable – volume 5 – contains detailed information and insights about all Anno4j functionalities and the MICO Metadata Model.
Distribution of own MMM / Anno4j Classes
The mapping of Anno4j is implemented through the utilisation of Java POJO classes as the main part. Optionally, namespace classes can facilitate the use of the RDF URIs, which can be quite long and complicated.
Simple common code sharing (e.g. via Maven like the MICO platform and Anno4j) is enough in order to make one’s own implementation and extension to the MMM / Anno4j accessible to others. As soon as someone has your implemented Anno4j classes, others can persist and query for your knowledge/implemented ontology.
Exemplary Extraction Result for the RDF Model
As an example to show how to annotate a Java POJO in order to use it in the MICO platform via Anno4j, we will use the scenario of a face recognition algorithm. Consider the following picture (of Barack Obama):
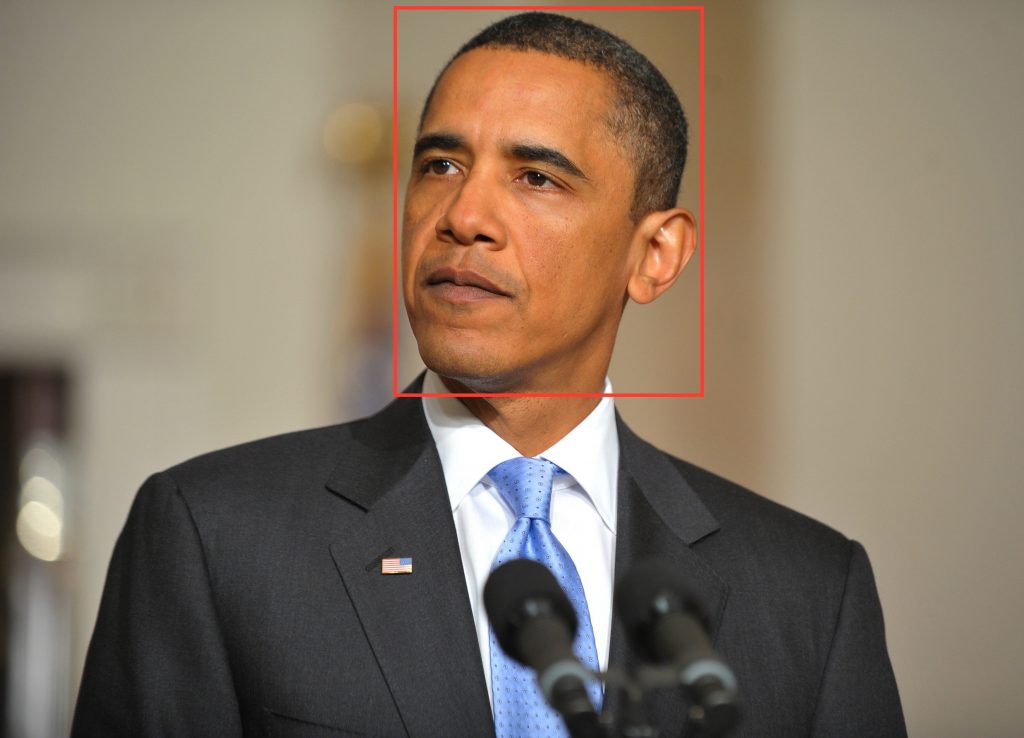
In this scenario, the result of a face recognition should support at least some key requirements of the analysis process. Among those are:
* The person that is recognised on the input image.
* The spatial fragment of the picture in which the person’s face is detected.
* The confidence of the extractor about its result (optional).
An exemplary RDF graph for a MICO Part Annotation, containing these mentioned requirements, could look like this:
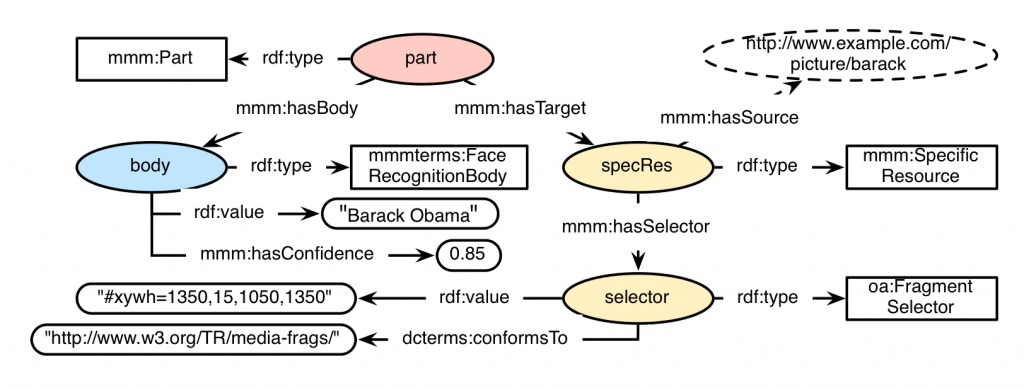
Integrating the ORM Anno4j Mapping in Order to Incorporate RDF Results
Anno4j and the MICO platform come with a lot of predefined classes for the Anno4j ORM mapping. Regarding the defined scenario, the implementation for the Part, the SpecificResource and the Selector is already present when including respective dependencies. What is missing is the node that represents the Body of the Part annotation. This is in general the main point to address, when you introduce new things to the MMM.
Adding a new node to the MMM is done by introducing a new interface class representing the Java POJO. That interface is then enhanced with Java Code-Annotations in order to establish the POJO to RDF mapping. For our scenario the body interface would look like this:
[code language=”java]@IRI(MMMTERMS.FACE_RECOGNITION_BODY)
public interface FaceRecognitionBody extends Body {
@IRI(RDF.VALUE)
void setValue(String value);
@IRI(RDF.VALUE)
String getValue();
@IRI(MMM.HAS_CONFIDENCE)
void setConfidence(double confidence();
@IRI(MMM.HAS_CONFIDENCE)
double getConfidence();[/code]
}
Important key points of the interface are:
* Interface Declaration: The Java nodes implemented must always be an interface and they should inherit from respective classes. In this case, as we want to implement a node with Body-behaviour, the interface needs to extend the Body interface. There are various classes predefined in Anno4j, like the Target, Body, Annotation, PartMMM, and ItemMMM. The top RDF concept is the ResourceObject, which needs to be extended when a new top level node is to be introduced.
* Java-Code Annotation at Interface Level: The Java-code annotation added at top level (@IRI(MMMTERMS.FACE_RECOGNITION_BODY)) is responsible for the RDF type (relationship rdf:type in the graph) that is assigned to respective nodes.
* Getter and Setter Pairs: A getter/setter pair defined in the interface will correspond to an RDF property or relationship in the RDF graph. For both the setter and getter, the same Java-code annotation needs to be added. In the case of the scenario, two pairs are added with the @IRI(RDF.VALUE) and @IRI(MMM.HAS_CONFIDENCE) annotation respectively. These result in the RDF properties rdf:value and mmm:hasConfidence.
Exemplary Java Workflow
A Java workflow that would create all the associated RDF nodes and relations seen in the figure of the scenario above is shown in the following Java excerpt. When executed, the ORM mapping of Anno4j creates all associated RDF triples automatically and persists them to the supported SPARQL 1.1 triplestore.
[code language=”java”]// Create Anno4j instance
Anno4j anno4j = new Anno4j();
// Create single nodes
PartMMM part = anno4j.createObject(PartMMM.class);
FaceRecognitionBody body = anno4j.createObject(FaceRecognitionBody.class);
body.setValue(“Barack Obama”);
body.setConfidence(0.85);
FragmentSelector selector = anno4j.createObject(FragmentSelector.class);
selector.setConformsTo(“http://www.w3.org/TR/media-frags/”);
selector.setValue(“#xywh=1350,15,1050,1350”);
SpecificResourceMMM specRes = anno4j.createObject(SpecificResourceMMM.class);
// Set the source to the associated picture
specRes.setSource(… pictureURI …);
// Join nodes together
part.setBody(body);
part.addTarget(specRes);
specRes.setSelector(selector);[/code]
The code snippet makes use of the previously introduced FaceRecognitionBody.
Software Releases
Current Version
The current version of the MICO platform is 3.1.0 (changes) and is available as:
Virtual machine image
The virtual machine image provides a ready-to-use installation of the platform and can be downloaded as Open Virtualization Format (OVF). This format is supported by most current virtualization software. We recommend the use of VirtualBox.
The image is not intended for use in public or untrusted environments! The reason is that there are no safeguards against unauthorized (remote) access.
All platform services get started on boot. The extractor pipelines can be started using the configuration Web interface. See below for first steps.
The default user and password for accessing the MICO platform services is mico.
The provided virtual machine image comes with preconfigured port forwardings:
- 22080 → 80 (MICO platform overview page)
- 22022 → 22 (SSH; Username: user, Password: user)
- 8080 → 8080 (Tomcat: Broker, Marmotta and pipeline configuration webinterface)
- 5672 → 5672 (RabbitMQ)
- 15672 → 15672 (RabbitMQ administrative webinterface)
- 8020, 50010 → 8020, 50010 (HDFS: Hadooop Distributed Filesystem)
Extractors and pipelines
The following extractor pipelines are available:
- Face detection in images
- Face detection in video key-frames
- Animal detection in images
- Temporal video segmentation (This extractor is not for public available. Contact us, if you are interested.)
First steps
The URL of the overview page and the provided services depends on your network configuration. In the first step you should configure the DNS resolver of the computers from wich you access the MICO platform. For Windows open the file %systemroot%\system32\drivers\etc\hosts (where %systemroot% depends on you local configuration, but typically is c:\windows), on *nix systems it is /etc/hosts (make sure you have administrative privileges) and insert a line with the hostname of the machine the MICO platform runs on followed by its external IP adress. If you run the virtual machine image on your local computer this will look like:
mico-platform 127.0.0.1
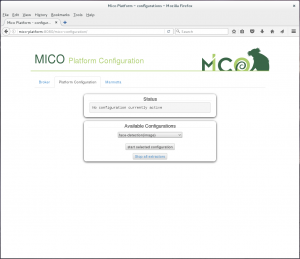
Then start a browser and go to the overview page http://<mico-platform-hostname>/ (or http://mico-platform:22080/ if you use the virtual machine on your local computer). Something like the following should show up:
Go to the pipline configuration page and start an extractor pipeline: http://<mico-platform-hostname>:8080/mico-configuration/
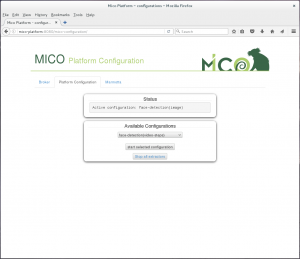
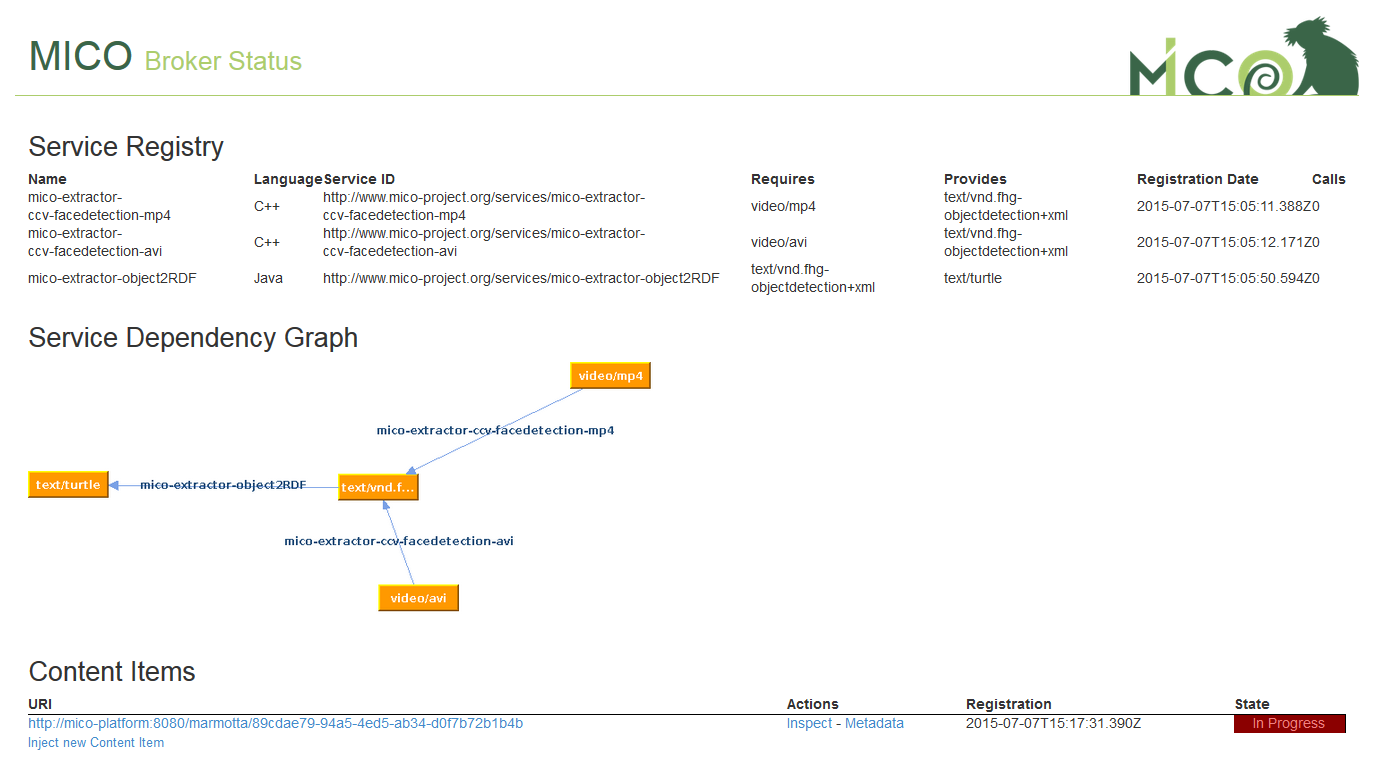
Now switch to the broker status page http://<mico-platform-hostname>:8080/broker/ where you can see the pipeline graph:
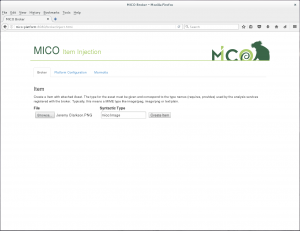
At the bottom of the broker status page you can find the link to inject new content item at the bottom of the page. When you go there and click create new, you will be asked to upload a file that can be processed by the current active extractor pipeline:
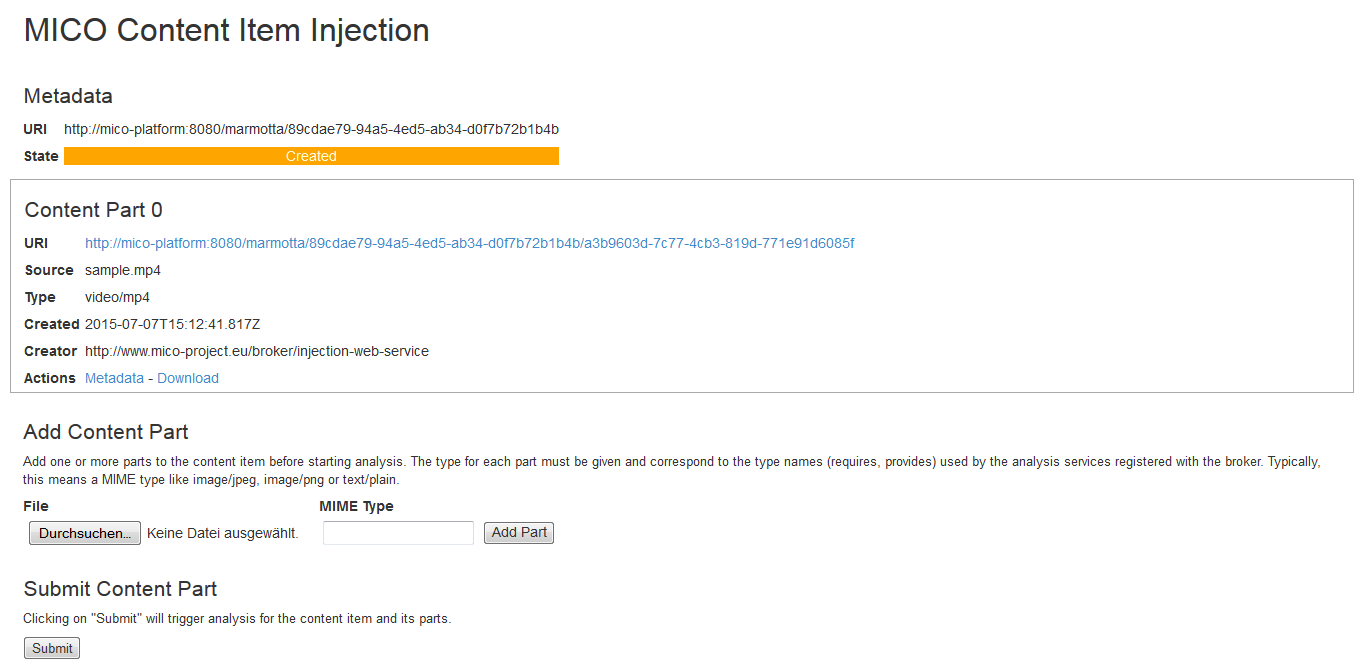
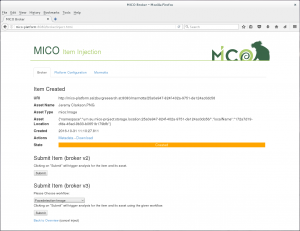
When you click submit and go back to the broker status page http://<mico-platform-hostname>:8080/broker/ you can see the state of the extraction process and examine the uploaded data and when the extraction process has finsished the results:
Pipeline configuration
For ease of use, we developed a webinterface where you can start and stop the preconfigured extractor pipelines.
Previous Releases
Older MICO platform releases are available as virtual machine images only:
- Version 3.0.4 (changes)
- Version 3.0.3 (changes)
- Version 3.0.2 (changes)
- Version 3.0.1 (changes)
- Version 3.0.0 (changes)
- Version 2.0.2 (changes)
- Version 2.0.1 (changes)
- Version 2.0.0 (changes)
- Version 1.2.11 (changes)
- Version 1.2.10 (changes)
- Version 1.2.9 (changes)
- Version 1.2.8 (changes)
- Version 1.2.7 (changes)
- Version 1.2.6 (changes)
- Version 1.2.5 (changes)
- Version 1.2.4 (changes)
- Version 1.2.3 (changes)
- Version 1.2.2 (changes)
- Version 1.2.1 (changes)
- Version 1.2.0 (changes)
- Version 1.1.1 (changes)
- Version 1.1.0 (changes)
Software Licenses
Extractor licenses
AUDIO & VIDEO ANALYSIS
-
Audio Demux
- Version: 2.2.1
- Language: C++
- Purpose: processing step, separates audio from audio/video stream, resampling
- License: GPL (sources available in extractor repository)
-
Speech-to-text (Kaldi)
- Version: 2.2.0
- Language: Java
- Purpose: annotation, transform audio into text annotations
- License: ASL2.0 (sources available in extractor repository)
-
Speech-to-text (BING)
- Version: 1.1.0
- Language: Java
- Purpose: annotation, transform audio into text annotations
- License: ASL2.0 (sources available in extractor repository, MS Bing API access required)
-
Temporal Video Segmentation
- Version: 2.2.0
- Language: C++
- Purpose: shot annotation, shot and key frame extraction
- License: Proprietary (FhG, available on request)
-
Media Quality
- Version: discontinued
- Language: C++
- Purpose: media quality annotation for different quality features
- License: Proprietary (FhG, available on request)
-
Audio Editing Detection
- Version: 2.0.0
- Language: C++
- Purpose: annotates whether an audio track has been edited / cut or not
- License: Proprietary (FhG, available on request)
-
Media Info
- Version: 2.0.0
- Language: C++
- Purpose: annotation of technical media metadata (container, codec)
- License: ASL2.0 (sources available in extractor repository)
-
MediaTags2rdf
- Version: 0.9.0
- Language: Java
- Purpose: annotation helper for Media Info extractor
- License: ASL2.0 (sources available in extractor repository)
-
Speech Music Discrimination
- Version: discontinued
- Language: C++
- Purpose: annotation whether an audio track contains speech or music
- License: Proprietary (FhG, available on request)
IMAGE ANALYSIS
-
Animal Detection (HoG based)
- Version: 2.1.1
- Language: C++
- Purpose: detection and annotation of animals (model for 10 species)
- License: ASL2.0 (sources available in extractor repository)
-
Animal Detection (DPM based)
- Version: 1.0.2
- Language: C++
- Purpose: detection and annotation of animals (model for 10 species)
- License: ASL2.0 (sources available in extractor repository)
-
Animal Detection (CNN based)
- Version: 1.0.2
- Language: C++
- Purpose: detection and annotation of animals (model for 10 species)
- License: ASL2.0 (sources available in extractor repository)
-
Face Detection
- Version: 2.1.0
- Language: C++
- Purpose: detection and annotation of human faces in images or videos
- License: ASL2.0 (sources available in extractor repository)
-
ObjectDetection2RDF
- Version: 2.2.0
- Language: Java
- Purpose: annotation helper, converts native object annotation (face detection, animal detection) into MICO RDF
- License: ASL2.0 (sources available in extractor repository)
TEXT ANALYSIS
-
Diarization
- Version: 1.3.0
- Language: Java
- Purpose: processing step, separates sentences to words
- License: ASL2.0 (sources available in extractor repository)
-
Kaldi2rdf
- Version: 3.1.0
- Language: Java
- Purpose: annotation helper, converts Kaldi speech to text annotations into MICO RDF
- License: ASL2.0 (sources available in extractor repository)
-
Kaldi2txt
- Version: 2.2.0
- Language: Java
- Purpose: processing step, converts Kaldi speech to text annotations into plain text
- License: ASL2.0 (sources available in extractor repository)
-
Redlink Text Analysis
- Version: 1.0.0
- Language: Java
- Purpose: annotation of named entity recognition results
- License: ASL2.0 (sources available in extractor repository, Redlink API access required)
-
OpenNLP NER
- Version: 1.3.0
- Language: Java
- Purpose: annotation of named entity recognition results
- License: ASL2.0 (sources available in extractor repository)
-
OpenNLP Competence
- Version: 1.2.0
- Language: Java
- Purpose: annotation of competence classification results
- License: ASL2.0 (sources available in extractor repository)
-
OpenNLP Sentiment
- Version: 1.2.0
- Language: Java
- Purpose: annotation of sentiment analysis results
- License: ASL2.0 (sources available in extractor repository)
-
Text Language detection
- Version: 1.0.2
- Language: Java
- Purpose: annotation of language used in plain text
- License: ASL2.0 (sources available in extractor repository)
Open Source
OSS Tools
The MICO platform and the extractor APIs are Open Source Software (OSS) and licensed under the Apache License Version 2.0. As for the MICO extractors, there is an “open business” approach: Many extractors are OSS (Apache License Version 2.0 or GPL) while other are closed source commercial software(e.g. they have been brought into the project as so-called “background knowledge”). The modular, service based MICO system architecture makes it easy to develop, deploy and run both types of extractors.
We used a lot of existing open source software for extractor implementation (see Figure above). Thus MICO directly benefit from the scientific advances and improvements made within these popular OSS projects.
Apache Marmotta
 APACHE MARMOTTA™ (TOP-LEVEL PROJECT) IS AN OPEN PLATFORM FOR LINKED DATA.
Apache Marmotta™ provides an open implementation of a Linked Data Platform that can be used, extended and deployed easily by organisations who want to publish Linked Data or build custom applications on Linked Data. Apache Marmotta™ is a project and a trademark of the Apache Software Foundation, independent of MICO, although our team is committed to the development and continuous growth of this project. Apache Marmotta™ is a trademark and project of the Apache Software Foundation independent of MICO.
Apache Hadoop (HDFS)
![]() The Apache Hadoop™ software library is a framework that allows for the distributed processing of large data sets across clusters of computers using simple programming models. In MICO, we’re using the HDFS™ (Hadoop Distributed File System) as one storage implementation for media items.
The Apache Hadoop™ software library is a framework that allows for the distributed processing of large data sets across clusters of computers using simple programming models. In MICO, we’re using the HDFS™ (Hadoop Distributed File System) as one storage implementation for media items.
Apache Camel
![]() Apache Camel™ is a rule-based routing and mediation engine that provides a Java object-based implementation of the Enterprise Integration Patterns using an API (or declarative Java Domain Specific Language) to configure routing and mediation rules.(source: Wikipedia under CC Attribution Share-Alike license). In MICO the broker v3 uses camel to define its routes.
Apache Camel™ is a rule-based routing and mediation engine that provides a Java object-based implementation of the Enterprise Integration Patterns using an API (or declarative Java Domain Specific Language) to configure routing and mediation rules.(source: Wikipedia under CC Attribution Share-Alike license). In MICO the broker v3 uses camel to define its routes.
Apache Prediction IO (incubating)
![]() Apache PredictionIO (incubating) is an open source Machine Learning Server built on top of state-of-the-art open source stack for developers and data scientists create predictive engines for any machine learning task.
Apache PredictionIO (incubating) is an open source Machine Learning Server built on top of state-of-the-art open source stack for developers and data scientists create predictive engines for any machine learning task.
RabbitMQ
![]() RabbitMQ™ is open source message broker software (sometimes called message-oriented middleware) that implements the Advanced Message Queuing Protocol (AMQP). The RabbitMQ server is written in the Erlang programming language and is built on the Open Telecom Platform framework for clustering and failover. Client libraries to interface with the broker are available for all major programming languages. (source: Wikipedia under CC Attribution Share-Alike license)
RabbitMQ™ is open source message broker software (sometimes called message-oriented middleware) that implements the Advanced Message Queuing Protocol (AMQP). The RabbitMQ server is written in the Erlang programming language and is built on the Open Telecom Platform framework for clustering and failover. Client libraries to interface with the broker are available for all major programming languages. (source: Wikipedia under CC Attribution Share-Alike license)