The following section will guide through the process of annotating results. This means to the preparation of your own extractor and the incorporation of an extractor’s result into the RDF structure of the MICO platform. To do this, we will explain in short how the results are represented inside the MICO platform and what the RDF graph looks like, then we will show small examples that explain step by step of how to create results.
The MICO Metadata Model MMM (see also this blogpost) establishes the RDF ontology and therefore the model that is used for all intermediary and final results in the MICO platform. The MMM is an extension to the Web Annotation Data Model WADM, adding a layer of interlinkability and provenance atop the core concept of the WADM – the **Web Annotation**. These are utilised to support information about a given resource in a modular way.
The core technical component to persist and query results is Anno4j (documentation is available on the github page, see also this blogpost, a paper is available here), which provides an Object-RDF-Mapping (ORM) that is utilised in order to turn simple Java POJOs into RDF metadata and vice versa. Anno4j is used for Java extractors, for the C++ pendants an extensions to the library called Anno4cpp has been implemented.
For the interested user and for further clarification, we advise to read the MICO deliverables written in the period of the MICO project. Especially the last deliverable – volume 5 – contains detailed information and insights about all Anno4j functionalities and the MICO Metadata Model.
Distribution of own MMM / Anno4j Classes
The mapping of Anno4j is implemented through the utilisation of Java POJO classes as the main part. Optionally, namespace classes can facilitate the use of the RDF URIs, which can be quite long and complicated.
Simple common code sharing (e.g. via Maven like the MICO platform and Anno4j) is enough in order to make one’s own implementation and extension to the MMM / Anno4j accessible to others. As soon as someone has your implemented Anno4j classes, others can persist and query for your knowledge/implemented ontology.
Exemplary Extraction Result for the RDF Model
As an example to show how to annotate a Java POJO in order to use it in the MICO platform via Anno4j, we will use the scenario of a face recognition algorithm. Consider the following picture (of Barack Obama):
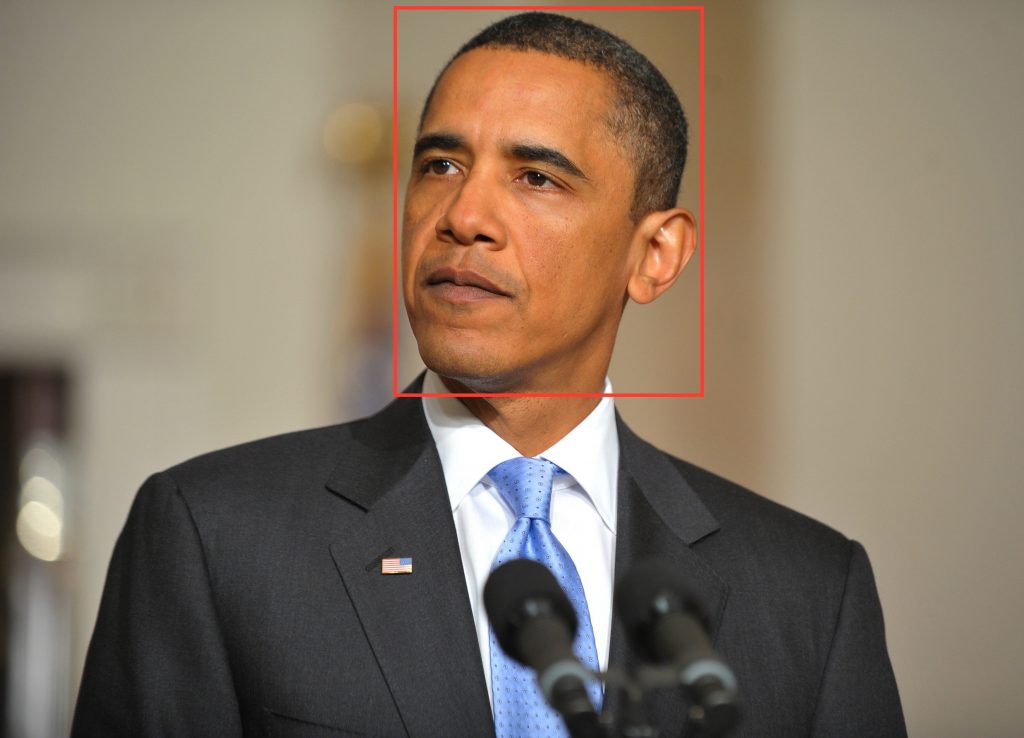
In this scenario, the result of a face recognition should support at least some key requirements of the analysis process. Among those are:
* The person that is recognised on the input image.
* The spatial fragment of the picture in which the person’s face is detected.
* The confidence of the extractor about its result (optional).
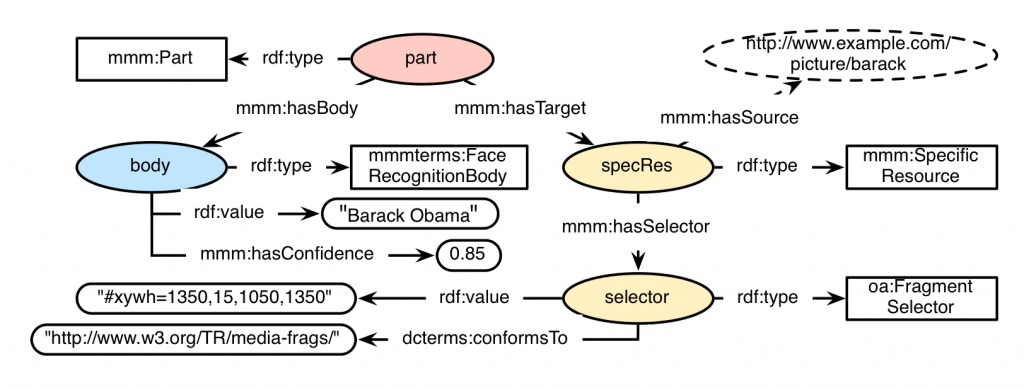
An exemplary RDF graph for a MICO Part Annotation, containing these mentioned requirements, could look like this:
Integrating the ORM Anno4j Mapping in Order to Incorporate RDF Results
Anno4j and the MICO platform come with a lot of predefined classes for the Anno4j ORM mapping. Regarding the defined scenario, the implementation for the Part, the SpecificResource and the Selector is already present when including respective dependencies. What is missing is the node that represents the Body of the Part annotation. This is in general the main point to address, when you introduce new things to the MMM.
Adding a new node to the MMM is done by introducing a new interface class representing the Java POJO. That interface is then enhanced with Java Code-Annotations in order to establish the POJO to RDF mapping. For our scenario the body interface would look like this:
[code language=”java]@IRI(MMMTERMS.FACE_RECOGNITION_BODY)
public interface FaceRecognitionBody extends Body {
@IRI(RDF.VALUE)
void setValue(String value);
@IRI(RDF.VALUE)
String getValue();
@IRI(MMM.HAS_CONFIDENCE)
void setConfidence(double confidence();
@IRI(MMM.HAS_CONFIDENCE)
double getConfidence();[/code]
}
Important key points of the interface are:
* Interface Declaration: The Java nodes implemented must always be an interface and they should inherit from respective classes. In this case, as we want to implement a node with Body-behaviour, the interface needs to extend the Body interface. There are various classes predefined in Anno4j, like the Target, Body, Annotation, PartMMM, and ItemMMM. The top RDF concept is the ResourceObject, which needs to be extended when a new top level node is to be introduced.
* Java-Code Annotation at Interface Level: The Java-code annotation added at top level (@IRI(MMMTERMS.FACE_RECOGNITION_BODY)) is responsible for the RDF type (relationship rdf:type in the graph) that is assigned to respective nodes.
* Getter and Setter Pairs: A getter/setter pair defined in the interface will correspond to an RDF property or relationship in the RDF graph. For both the setter and getter, the same Java-code annotation needs to be added. In the case of the scenario, two pairs are added with the @IRI(RDF.VALUE) and @IRI(MMM.HAS_CONFIDENCE) annotation respectively. These result in the RDF properties rdf:value and mmm:hasConfidence.
Exemplary Java Workflow
A Java workflow that would create all the associated RDF nodes and relations seen in the figure of the scenario above is shown in the following Java excerpt. When executed, the ORM mapping of Anno4j creates all associated RDF triples automatically and persists them to the supported SPARQL 1.1 triplestore.
[code language=”java”]// Create Anno4j instance
Anno4j anno4j = new Anno4j();
// Create single nodes
PartMMM part = anno4j.createObject(PartMMM.class);
FaceRecognitionBody body = anno4j.createObject(FaceRecognitionBody.class);
body.setValue(“Barack Obama”);
body.setConfidence(0.85);
FragmentSelector selector = anno4j.createObject(FragmentSelector.class);
selector.setConformsTo(“http://www.w3.org/TR/media-frags/”);
selector.setValue(“#xywh=1350,15,1050,1350”);
SpecificResourceMMM specRes = anno4j.createObject(SpecificResourceMMM.class);
// Set the source to the associated picture
specRes.setSource(… pictureURI …);
// Join nodes together
part.setBody(body);
part.addTarget(specRes);
specRes.setSelector(selector);[/code]
The code snippet makes use of the previously introduced FaceRecognitionBody.